Introduction678:-
IHi everyone this article demonstrates how to create and use a Dynamic Master-Detail-Page in Xamarin.Forms, XAML, and C#. This article starts with the introduction of the Master-Detail-Page tag in XAML.

Dear friends today I am going to tell you about master-detail page. friends I have faced so many problems while creating master-detail page.
Let's begin ………..
Definition:-
Master-Detail Page: - A page that displays the information in two parts, higher level and lower level.
IHi everyone this article demonstrates how to create and use a Dynamic Master-Detail-Page in Xamarin.Forms, XAML, and C#. This article starts with the introduction of the Master-Detail-Page tag in XAML.
Definition:-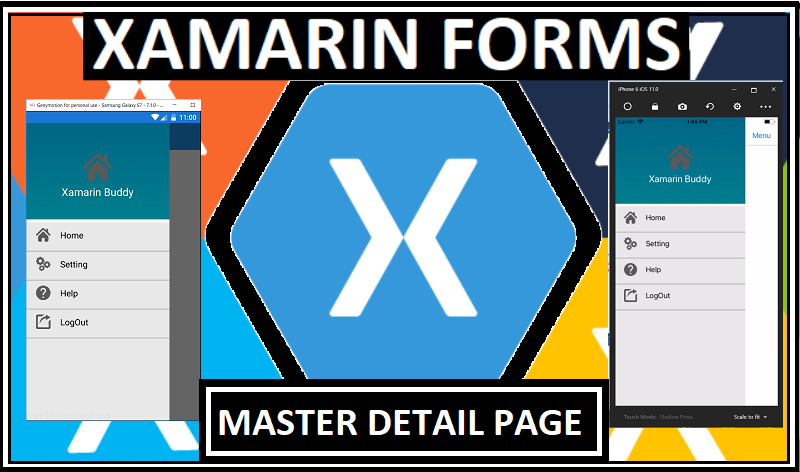
Dear friends today I am going to tell you about master-detail page. friends I have faced so many problems while creating master-detail page.
After a long struggle, I come up with some easy step to create master detail page. Before moving towards implementation let's have a short detail about the terms.
The master-detail page is a page in which we are creating menus to navigate through the application Like (Home,Setting,About,Help,Logout)Etc…
Master-detail menus are generally used in most of the mobile application it looks attractive also.
We can customize the master-detail page in our own way, and make it attractive.
Let's begin ………..

Open Visual Studio and select a New Project.

Now, select Cross-Platform App, give project name and set the project path. Then click OK.

Select the template as "Blank App" and code sharing as "PCL".

Step-1
Create a folder which is name as MenuItems and Views.

Right-click on MenuItems folder and select Add >> New Item or Add >> Class.

Step-2
We create a class MasterPageItem.cs and write the following C# code.
MasterPageItem.cs
public class MasterPageItem
{
public string Title { get; set; }
public string Icon { get; set; }
public Type TargetType { get; set; }
}
Step-3
In Views folder, you can create three pages to navigate through detail page.(Ctr+Sht+A is short cut key for add New Items) .
Like this =>
1. Home Page
2. Setting Page
3. Help Page
4. Logout Page
4. Logout Page
Step-4
Now, we will set up Main Page for the master-detail page and set the list view on the mater detail page.
<MasterDetailPage xmlns="http://xamarin.com/schemas/2014/forms"
             xmlns:x="http://schemas.microsoft.com/winfx/2009/xaml"
             xmlns:local="clr-namespace:XFMasterDetailPageNavigation"
             x:Class="NavigationMasterDetail.MainPage">
    <MasterDetailPage.Master>
        <ContentPage Title="Menu">
            <Grid BackgroundColor="Transparent">
                <Grid.RowDefinitions>
                    <RowDefinition Height="200" />
                    <RowDefinition Height="*" />
                </Grid.RowDefinitions>
                <Grid>
                    <Image Source="bg.png" Aspect="AspectFill" />
                    <StackLayout Padding="0,20,0,0" HorizontalOptions="CenterAndExpand" VerticalOptions="CenterAndExpand">
                        <Image Source="profile.png" Aspect="AspectFill" WidthRequest="85" HeightRequest="85" />
                        <Label Text="Xam Buddy" TextColor="White" FontSize="Large" />
                    </StackLayout>
                </Grid>
                <StackLayout  Grid.Row="1" Spacing="15">
                    <ListView x:Name="navigationDrawerList"
                  RowHeight="60"
                  SeparatorVisibility="None"
                  BackgroundColor="#e8e8e8"
                  ItemSelected="OnMenuItemSelected">
                        <ListView.ItemTemplate>
                            <DataTemplate>
                                <ViewCell>
                                    <!-- Main design for our menu items -->
                                    <StackLayout VerticalOptions="FillAndExpand"
                             Orientation="Horizontal"
                             Padding="20,10,0,10"
                             Spacing="20">
                                        <Image Source="{Binding Icon}"
                         WidthRequest="40"
                         HeightRequest="40"
                         VerticalOptions="Center" />
                                        <Label Text="{Binding Title}"
                         FontSize="Small"
                         VerticalOptions="Center"
                         TextColor="Black"/>
                                    </StackLayout>
                                </ViewCell>
                            </DataTemplate>
                        </ListView.ItemTemplate>
                    </ListView>
                </StackLayout>
            </Grid>
        </ContentPage>
    </MasterDetailPage.Master>
    <MasterDetailPage.Detail>
        <NavigationPage>
        </NavigationPage>
    </MasterDetailPage.Detail>
</MasterDetailPage>
Please make sure of the Menu title name………Step-5
using System;


using System.Collections.Generic;
using System.Linq;using System.Text;
using System.Threading.Tasks;
using Xamarin.Forms;
namespace XFMasterDetailPageNavigation {
public partial class MainPage : MasterDetailPage {
public List<MasterPageItem> menuList { get; set; }
public MainPage() {
InitializeComponent();
menuList = new List<MasterPageItem>();
// Adding menu items to menuList and you can define title ,page and icon
menuList.Add(new MasterPageItem() { Title = "Home", Icon = "home.png", TargetType = typeof(HomePage) });menuList.Add(new MasterPageItem() { Title = "Setting", Icon = "setting.png", TargetType = typeof(SettingPage) });
menuList.Add(new MasterPageItem() { Title = "Help", Icon = "help.png", TargetType = typeof(HelpPage) });
menuList.Add(new MasterPageItem() { Title = "LogOut", Icon = "logout.png", TargetType = typeof(LogoutPage) });
// Setting our list to be ItemSource for ListView in MainPage.xaml
navigationDrawerList.ItemsSource = menuList;
// Initial navigation, this can be used for our home page
Detail = new NavigationPage((Page)Activator.CreateInstance(typeof(TestPage1)));
}
// Event for Menu Item selection, here we are going to handle navigation based
// on user selection in menu ListView
private void OnMenuItemSelected(object sender, SelectedItemChangedEventArgs e) {
var item = (MasterPageItem)e.SelectedItem;
Type page = item.TargetType;
Detail = new NavigationPage((Page)Activator.CreateInstance(page));
IsPresented = false;
}
}
TADDA!!!!!!!!!

I hope that you like this type of navigation drawer (master-detail page) in your Xamarin.Forms App.
Happy Coding J
[\{}|A:CM<?
If you are lazzy download click here
If you want to watch this video, Click Here 
[\{}|A:CM<?
If you are lazzy download click here


I seem not to be able to build because the navigationDrawerList object didn't exist in the context of the MainPage.xaml.cs
ReplyDeleteyou have any idea how to fix it?
DeleteNice
ReplyDeleteNot Working
ReplyDeleteThank you so much for sharing !It's just amazing
ReplyDelete